Xiegu G90 Digital Modes Setup with DE-19 Interface
Introduction
I've been using the Xiegu G90 as my main HF rig for a while now. Living in an apartment means I can't put up large antennas or run high power, so my setup is pretty limited — but it works. For most of my operating, I stay around 15 watts, and I rely heavily on digital modes to make the most of the band conditions and power limitations.
Because the rig is a Xiegu, I chose to stick with their own DE-19 interface, and it's what I've been using for digital modes ever since. Despite the restricted environment, I've logged over 7,000 contacts across FT8, FT4, RTTY, and Olivia.
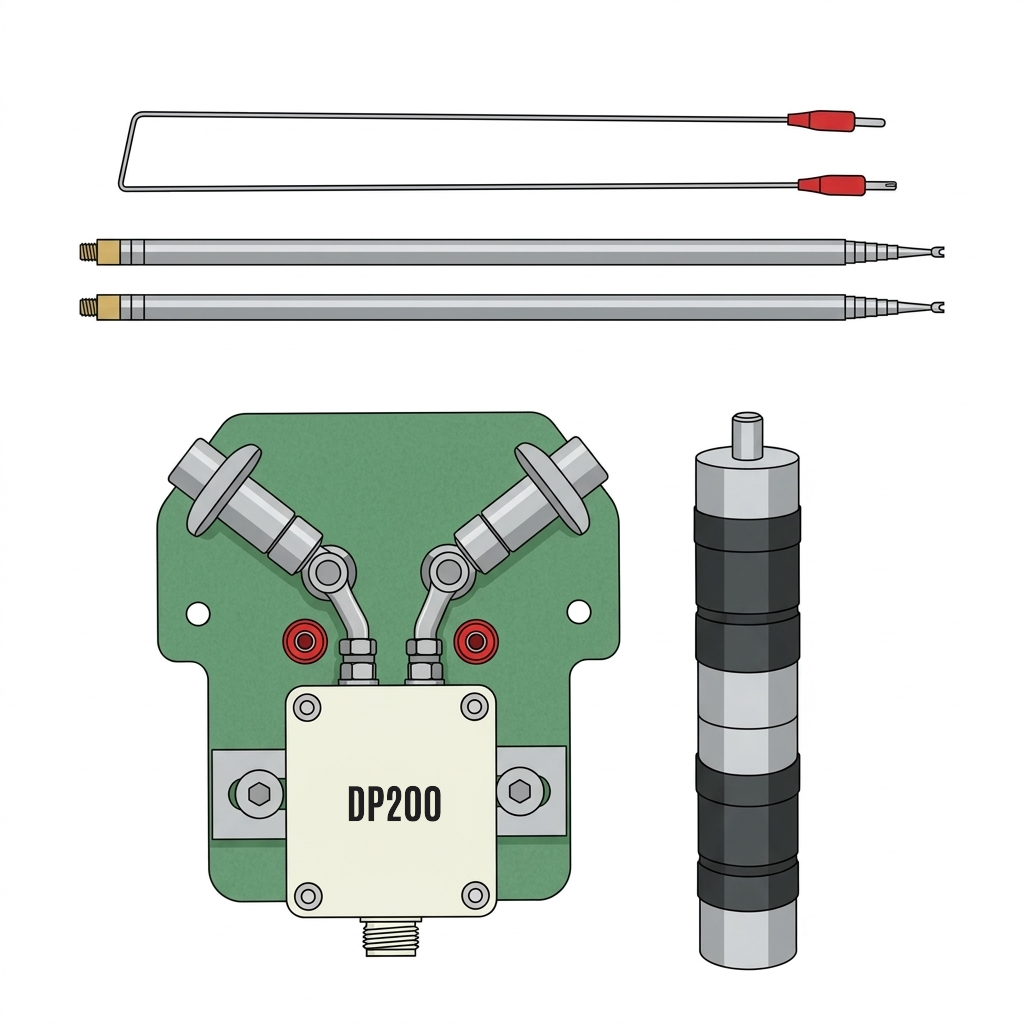 My main antenna is a DP200 telescopic dipole I picked up from AliExpress. Because of the space available, I can only extend it up to cover 17m properly. Anything lower than that is basically impossible where I live. Even then, the G90's tuner ends up doing most of the heavy lifting.
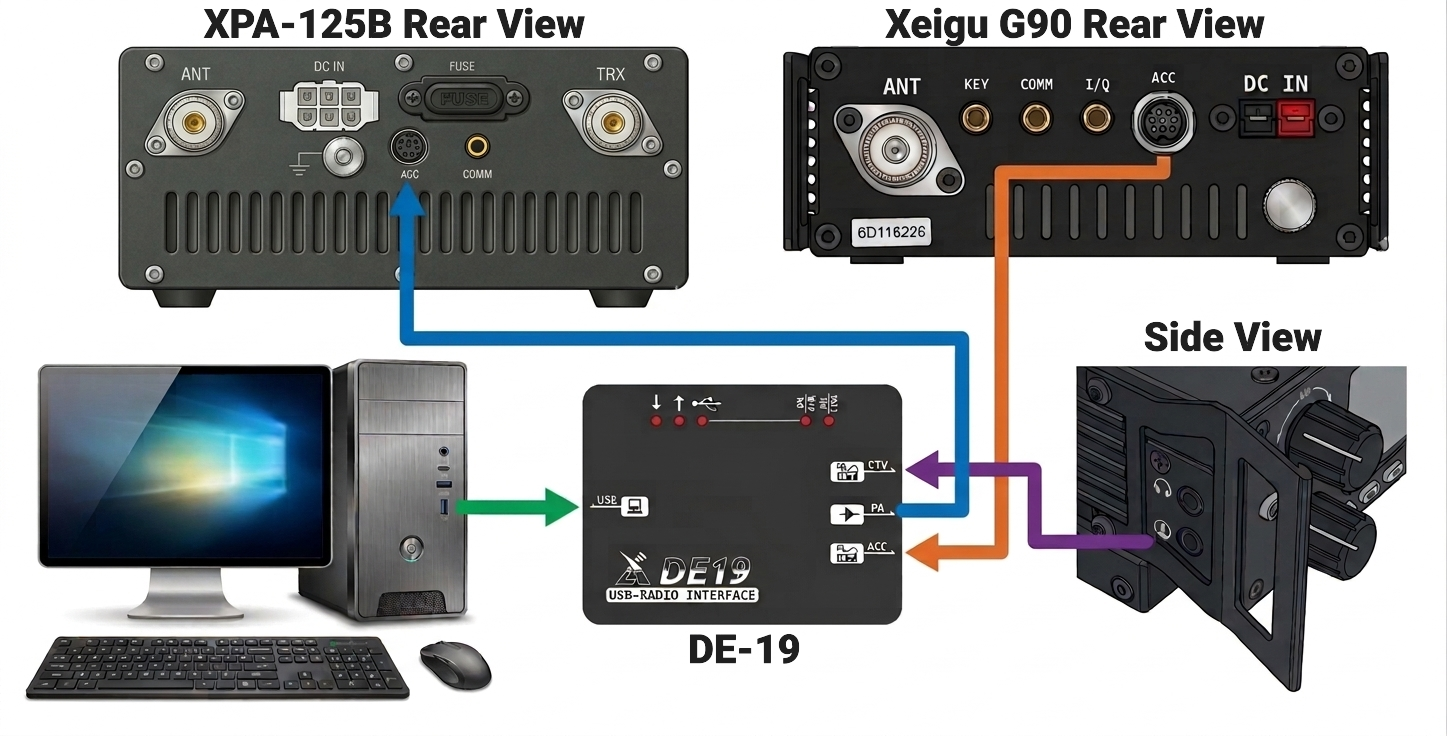
Understanding the DE-19 Interface
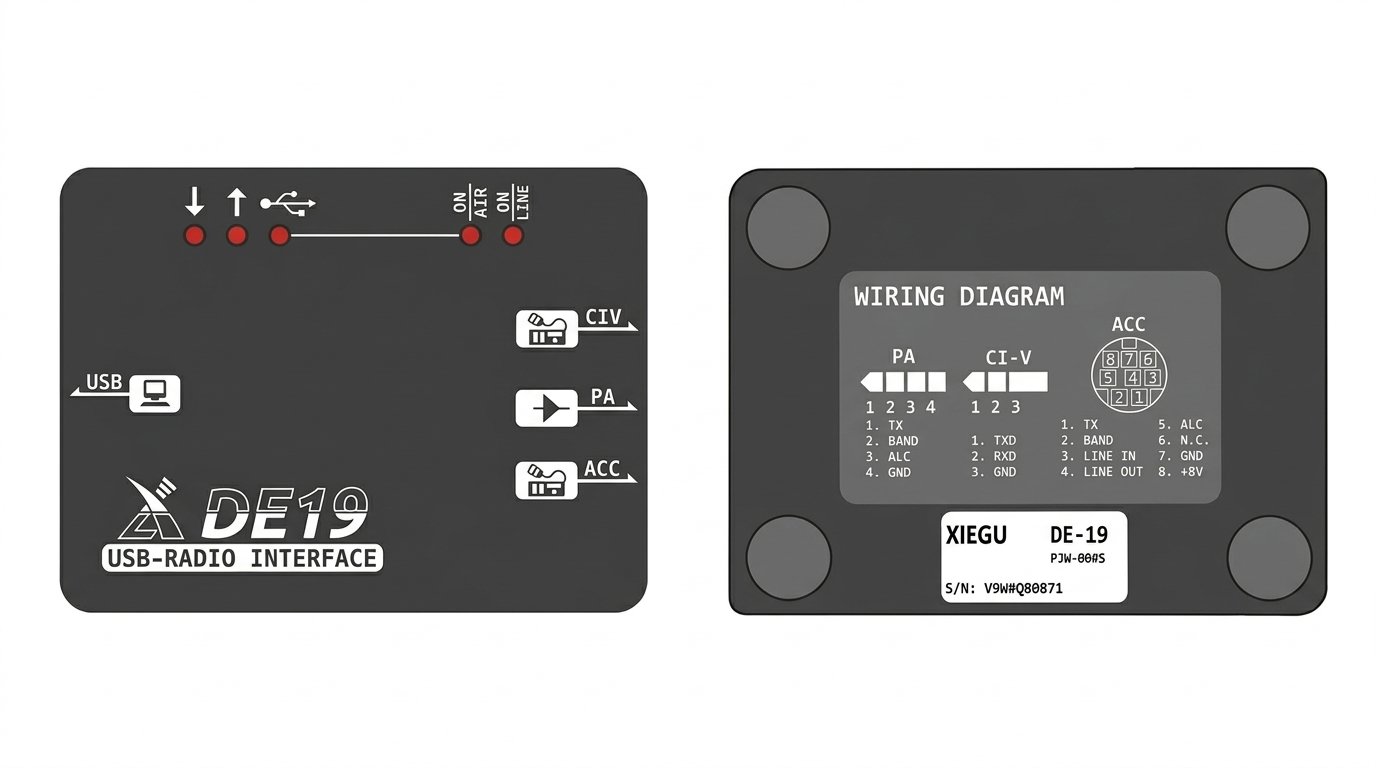
The DE-19 is Xiegu's dedicated digital-mode interface for radios like the G90, G90S, G106, and XPA125B. Since my main rig is the G90, I chose to use Xiegu's own interface instead of third-party solutions, and I've been running all my digital modes through it ever since.
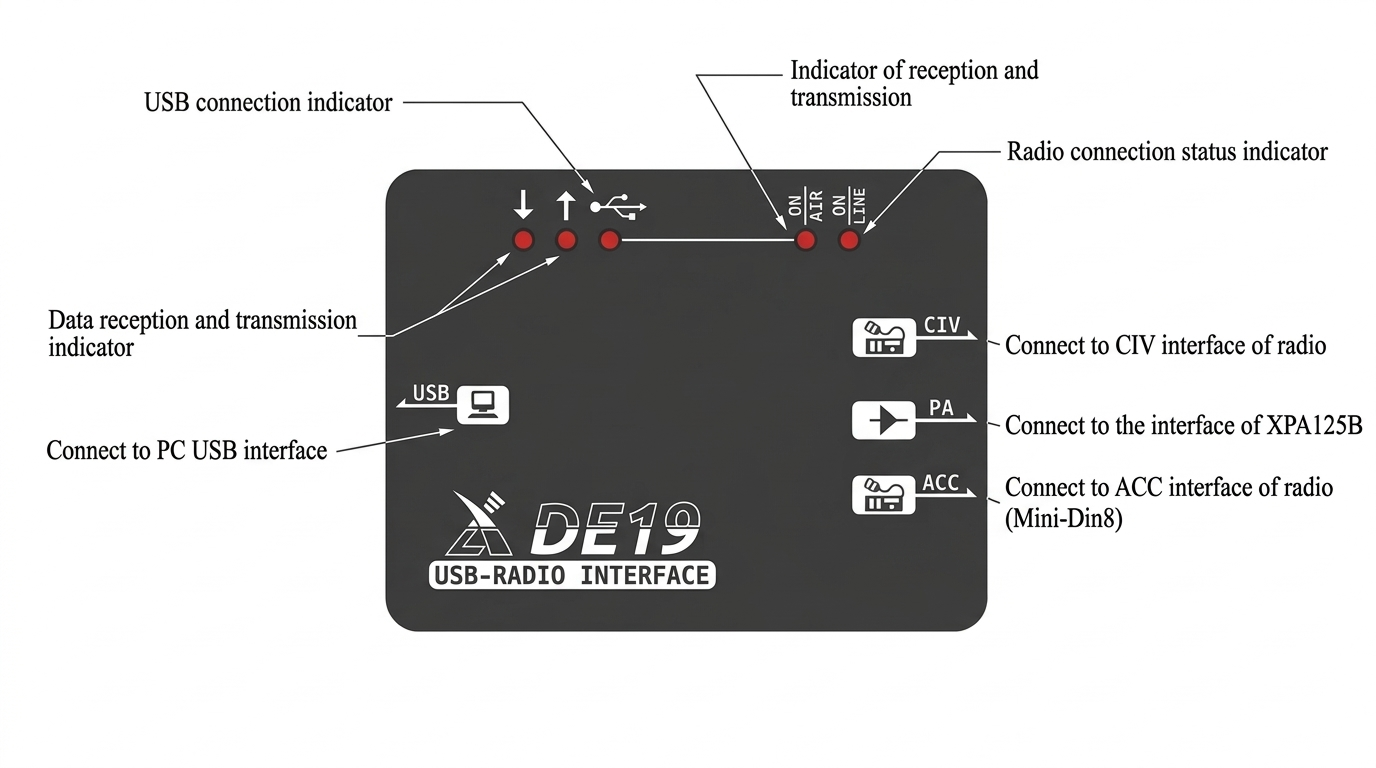
Functionally, the DE-19 is simple, it combines USB audio, PTT, and CAT control into one compact box. You connect two cables to the radio and one USB cable to the PC, and the DE-19 handles everything automatically.
Digital audio interface between PC and radio
Push-to-talk signaling for transmit
Frequency & Mode control
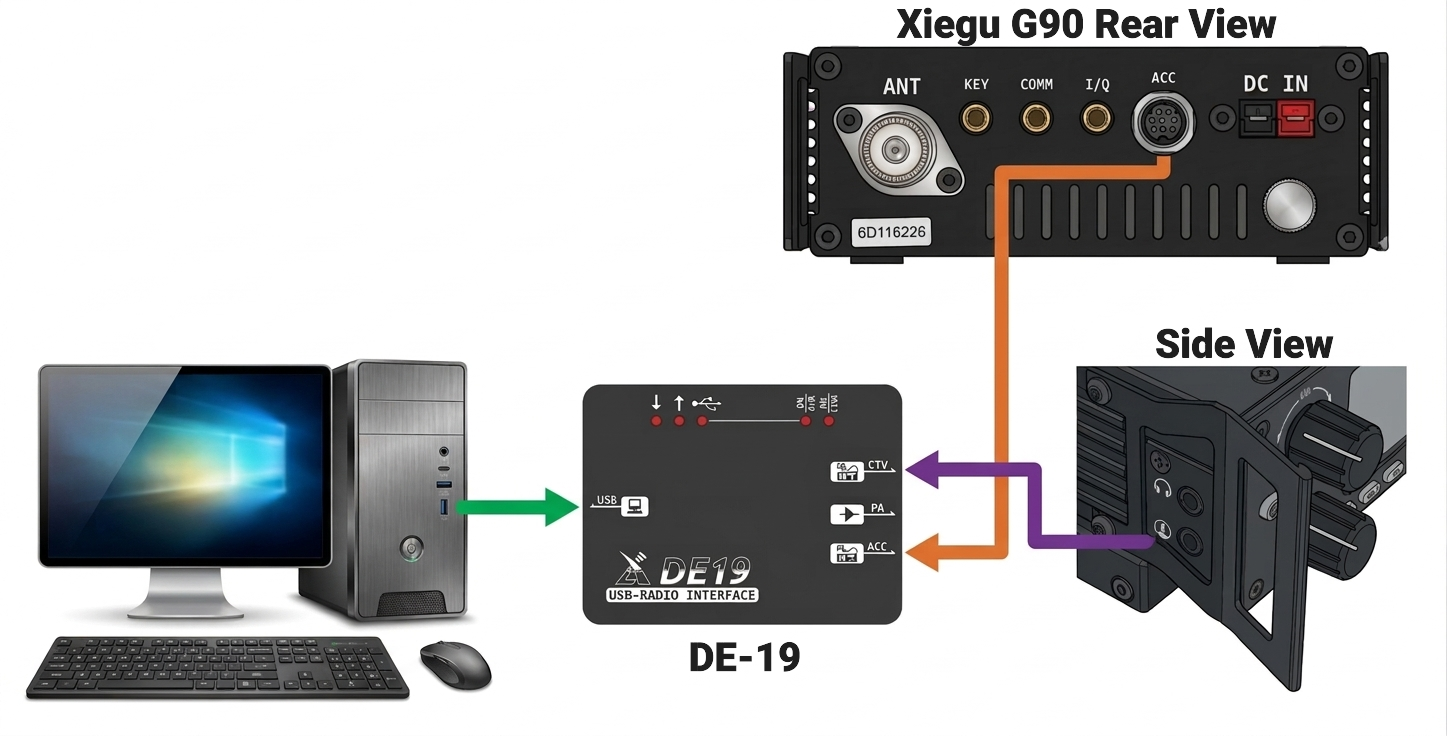
Connection Guide
- Install the CH342 driver
Enables both the virtual COM port. - Connect DE-19 ACC → G90 ACC port
Use the included 8-pin Mini-DIN cable. This carries the audio in/out. - Connect DE-19 CIV → G90 serial port (head unit)
Use the included 3.5mm TRS 3.5mm cable for CAT/PTT control. - Connect DE-19 → PC via USB-C
Provides USB audio + CAT control to the computer. - Optionally Connect PA OUT → XPA125B amplifier (ACC port)
Use the L4001 3.5mm TRRS to 8Pin Mini-DIN cable for external amplifier.
G90 Menu Configuration for Digital Modes
To get the Xiegu G90 working reliably with digital modes, a few menu settings need to be adjusted. These ensure clean audio, proper drive levels, and the correct bandwidth for FT8, FT4, RTTY, Olivia, and other digi modes.
Operating Mode
- U-D (USB-Digi) — for most HF digital modes
- L-D (LSB-Digi) — only on bands where LSB is standard
Audio Input / Output
| Parameter | Value | Description |
|---|---|---|
| Input Source | LINE | Use line-in input instead of mic-in input |
| AUX IN | 8 | Audio input level from PC → radio |
| AUX OUT | 15 | Audio output level from radio → PC |
RF & Power Settings
- RF Gain: ~80% — Adjust according to the specific band conditions
- Power: 10–15W — Safe and efficient for continuous-duty digital modes
Filtering & Processing
| Setting | Value | Reason |
|---|---|---|
| Filter Bandwidth | 3 kHz | Gives digital software the full passband |
| Compression | OFF | Prevents signal distortion |
| Preamp | OFF | Avoid overloading frontend |
| AGC | OFF | Maintain stable audio levels |
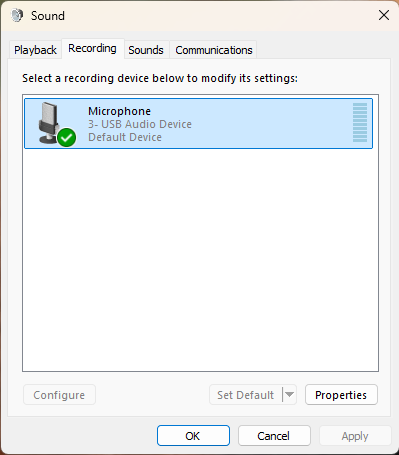
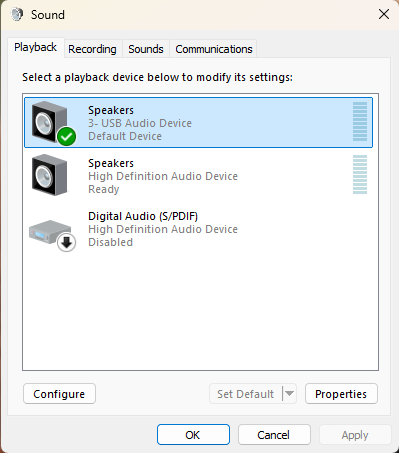
PC Sound Settings
To avoid distortion and ensure clean audio between the DE-19 and digital-mode software, it's important to configure the USB audio device properly in Windows. These settings help keep proper audio levels and prevent Windows from "enhancing" or altering the signal.
Playback Device
- Open Windows Sound Settings → Playback devices
- Select the USB Audio Device
- Levels tab: Set audio level to 50%
- Enhancements tab: Check Disable all enhancements
- Spatial sound tab: Set spatial sound to Off
Recording Device
- Open Windows Sound Settings → Recording devices
- Select the USB Audio Device
- Listen tab: Make sure Listen to this device is NOT checked
- Custom tab: Make sure AGC is unchecked
- Levels tab: Set audio level to 50%
Begin with playback and recording levels at 50%, then adjust as needed in your digital-mode software to optimize transmit audio and decoding.
Final Thoughts
The Xiegu G90 paired with the DE-19 interface is a compact, effective solution for apartment-based HF digital operation. Despite the limitations of restricted antenna space and QRP power levels, this setup has proven capable of working the world on FT8, RTTY, and other digital modes.
The key is in the details: proper audio levels, clean signal chain, and understanding that the G90's internal tuner is your friend when dealing with compromise antennas. The DE-19 simplifies the connection process by integrating audio, CAT, and PTT into a single USB interface—no additional sound cards or serial adapters needed.
Whether you're in a high-rise apartment, a HOA-restricted neighborhood, or just prefer a minimal shack, this configuration demonstrates that you don't need a tower and a kilowatt to enjoy HF digital modes. The bands are there—sometimes you just need to listen a bit more carefully and let the software do the heavy lifting.